A Guide
How to use this site
- How to use the accessibility settings
- How to watch the videos with the Able Player
- How to use the “Search” function
- How to use the “News” tab
- How to apply for the fellowship
I. How to Use the Accessibility Settings
Video Instructions
Written Instructions for How to use the Accessibility Settings, with Screenshots Below
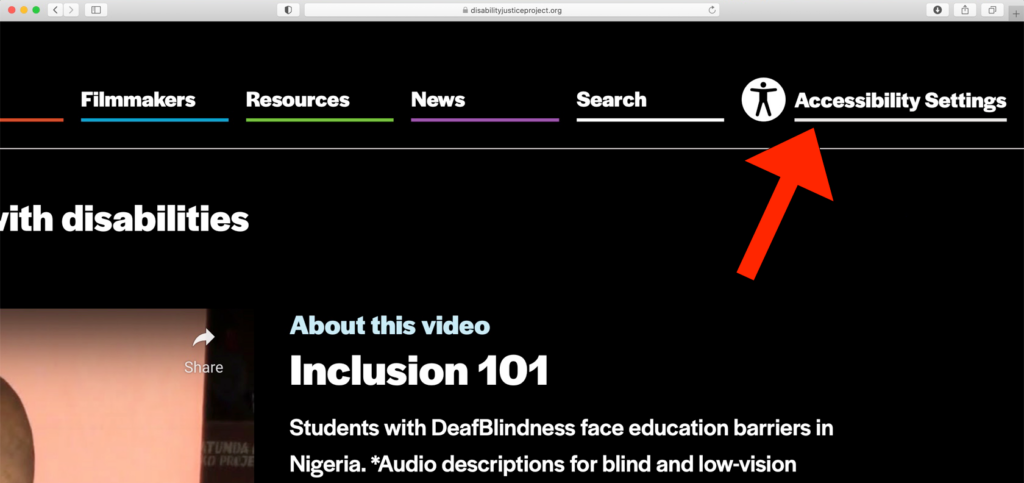
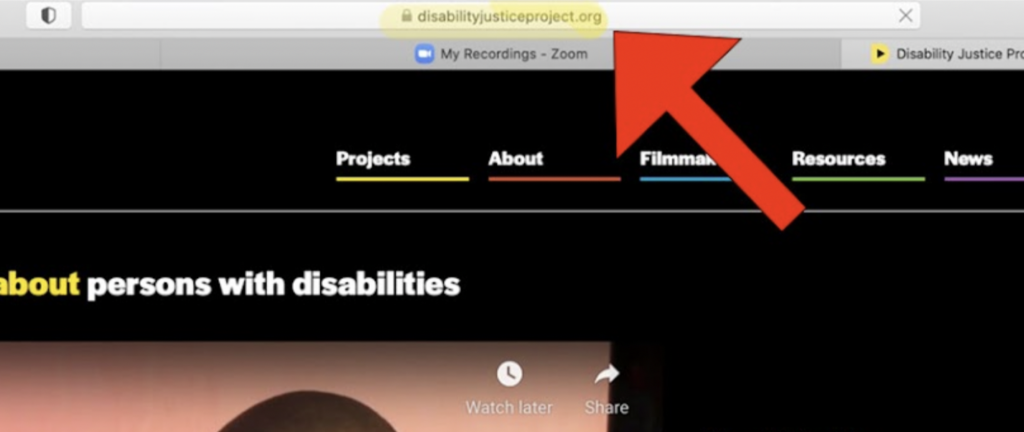
1. Type in disabilityjusticeproject.org.

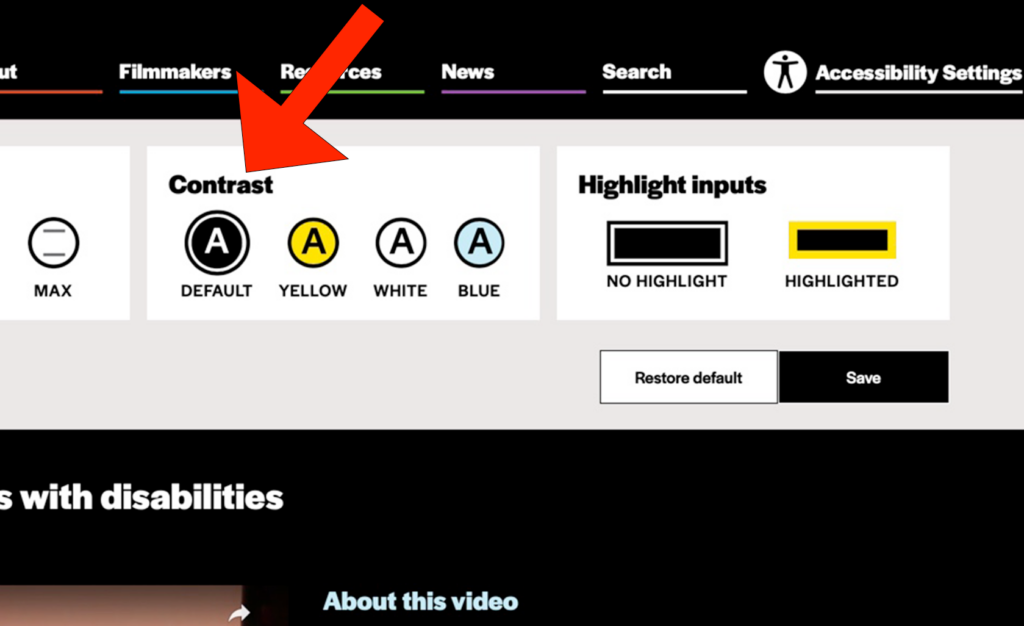
2. Click on “Accessibility Settings” in the top right corner. It has a white underline beneath it.
3. Once you click on “Accessibility Settings,” a tab will open showing different options: “Type Size,” “Line Spacing,” “Contrast,” and “Highlight Inputs.” Adjusting such options will change the appearance of the Disability Justice Project’s website.
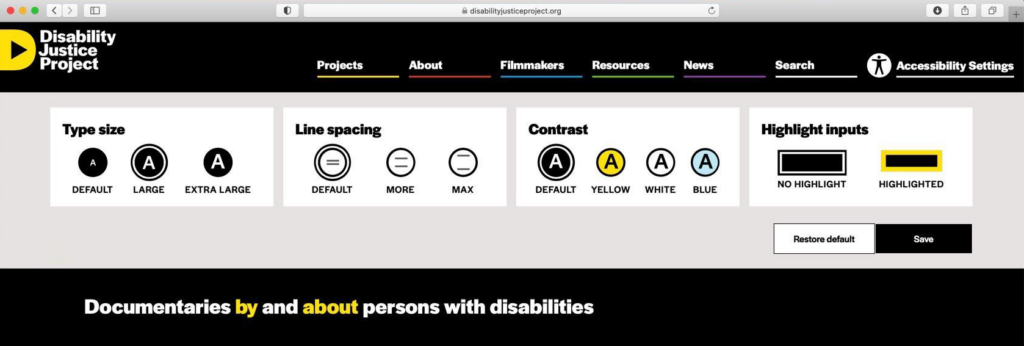
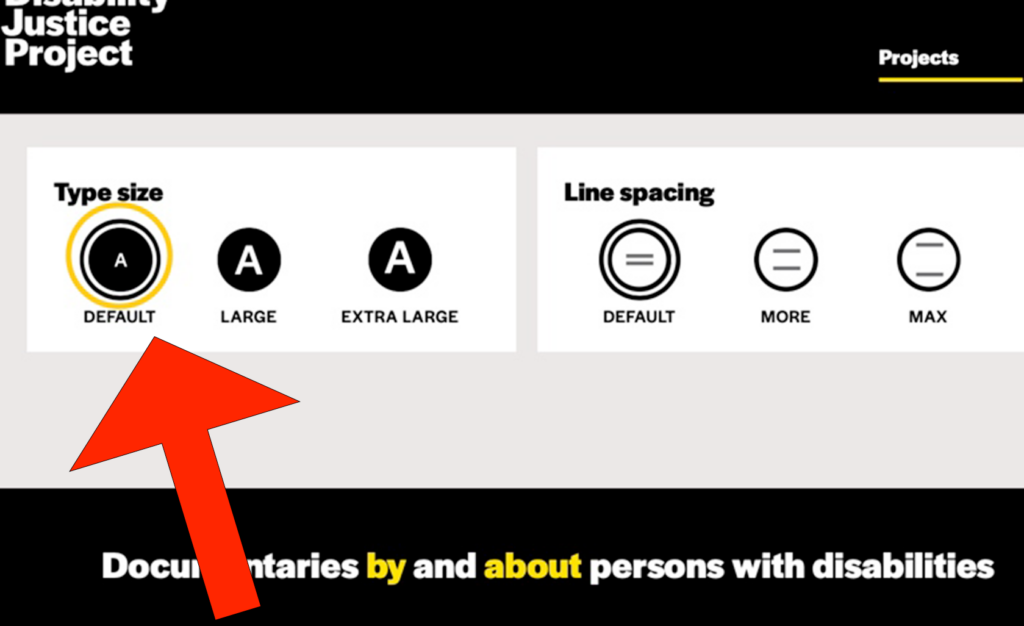
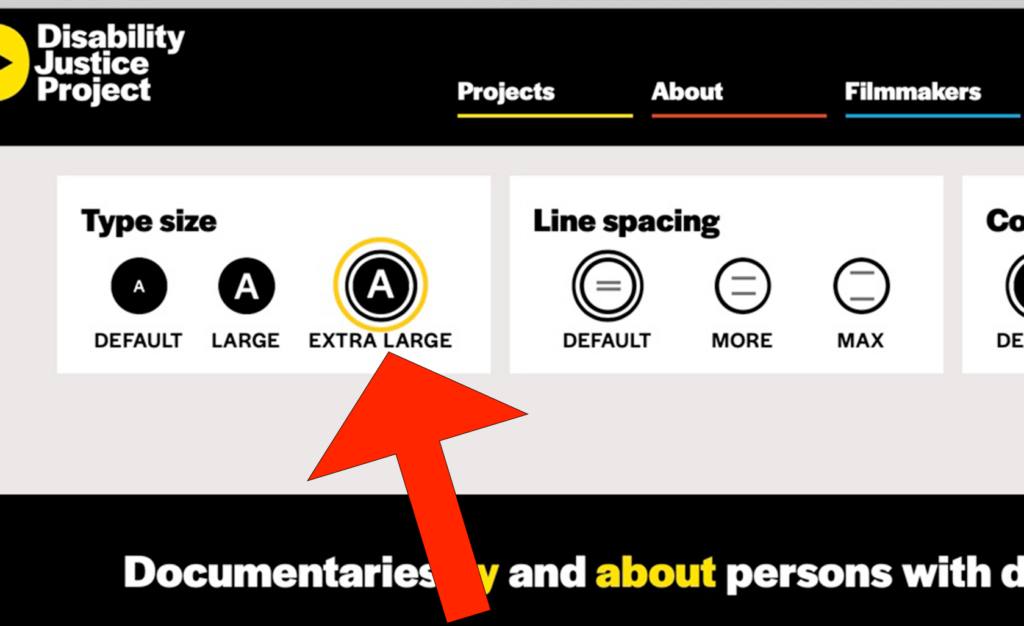
4. To adjust the type size, change the options listed under the “Type Size” section of the “Accessibility Settings” tab. Under the “Type Size” section are three accessibility options: “DEFAULT,” “LARGE,” and “EXTRA LARGE.”
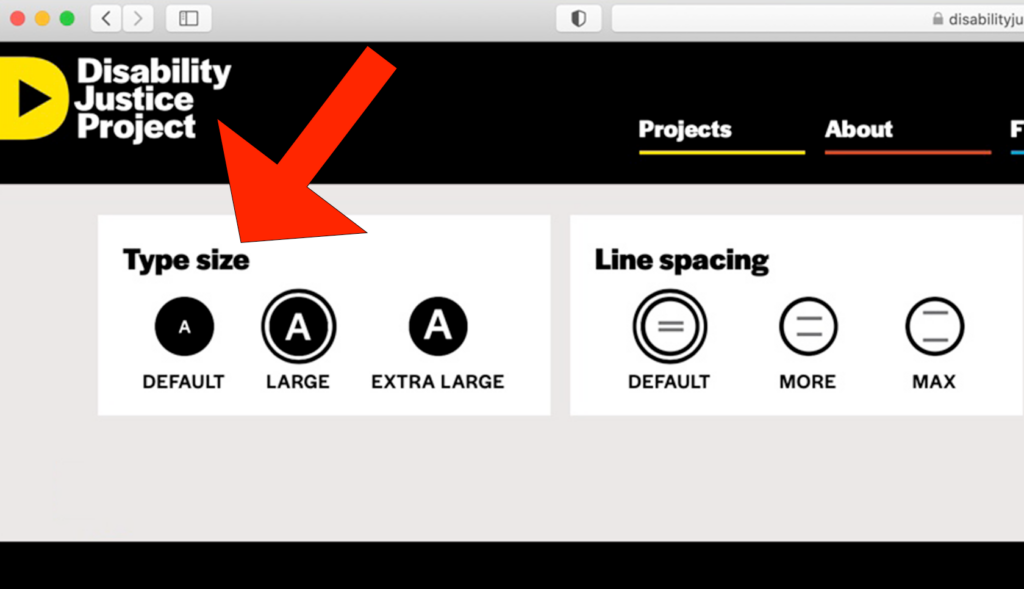
5. The “DEFAULT” type size is the smallest option. To choose the default type size, click on the “Type Size” icon furthest to the left, which is a black circle with the smallest white letter “A” in it. The icon has “DEFAULT” written below it.
6. The “LARGE” type size is the second largest option. To choose the large type size, click on the icon in the middle of the section that has a black circle with a medium-sized white letter “A” in it. The icon has “LARGE” written below it.
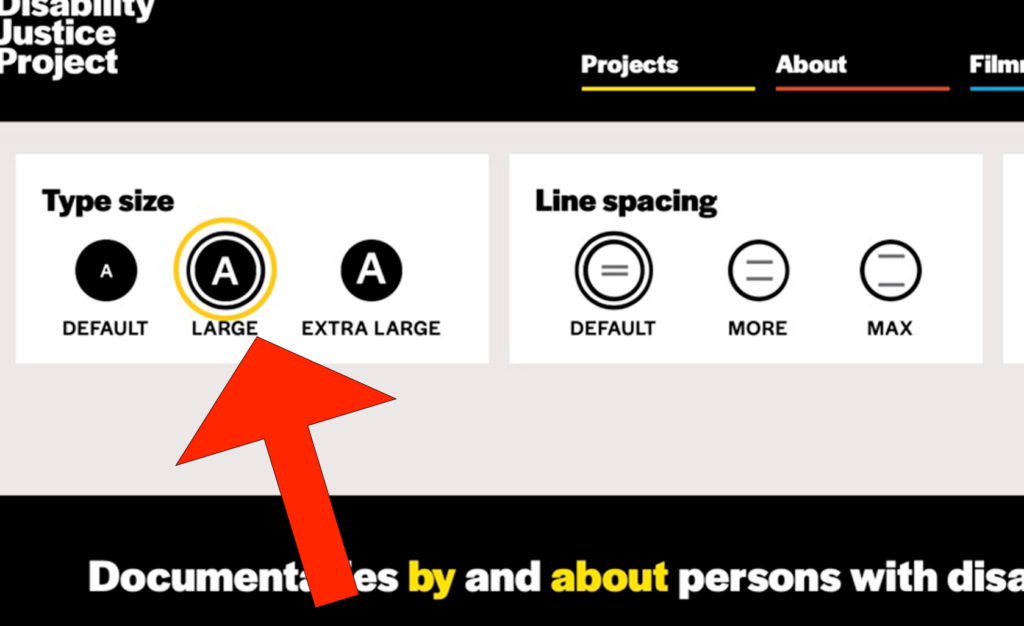
7. The “EXTRA LARGE” type size is the largest option. To choose the extra large type size, click on the icon that is furthest to the right and is a black circle with a large-sized white letter “A” in it. The icon has “EXTRA LARGE” written below it.
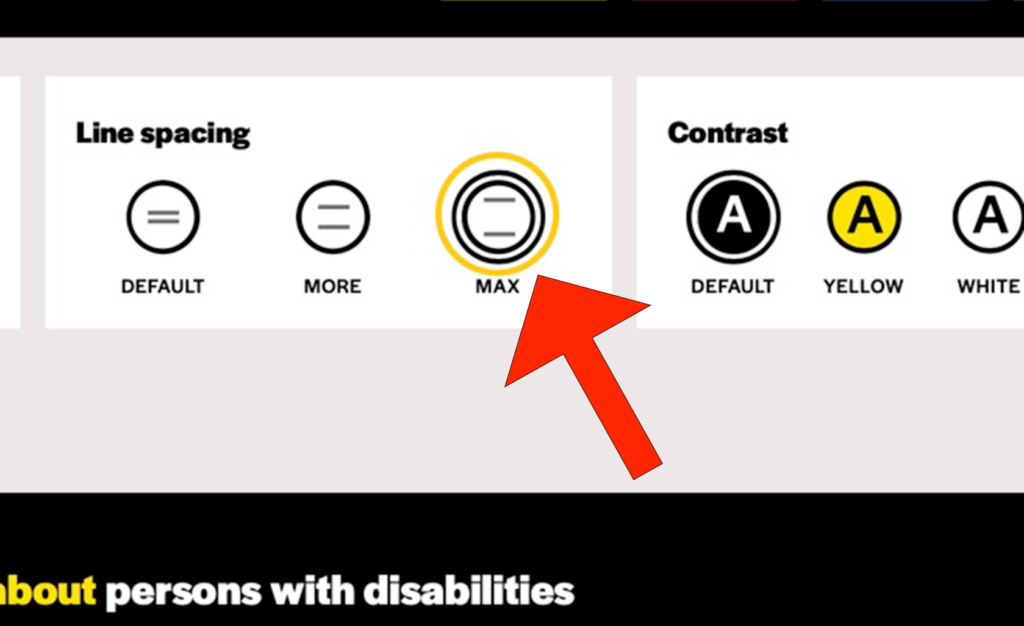
8. To adjust the “Line spacing,” change the options listed under the line spacing section of the “Accessibility Settings” tab. Under the “Line spacing” section, there are three accessibility options: “DEFAULT,” “MORE,” and “MAX.”

9. The “DEFAULT” line spacing option offers the least amount of space between text lines. To choose the “DEFAULT” option, click on the icon furthest to the left in the line spacing section that says “DEFAULT” below it. The icon is a white circle outlined in black with two black lines in the center.

10. The “MORE” line spacing option offers more space between text lines than the default setting. To choose the more option, click on the icon in the middle of the line spacing section that says “MORE” below it. The icon is a white circle outlined in black with two black lines in the center. The lines are spaced farther apart than those in the “DEFAULT” setting icon.
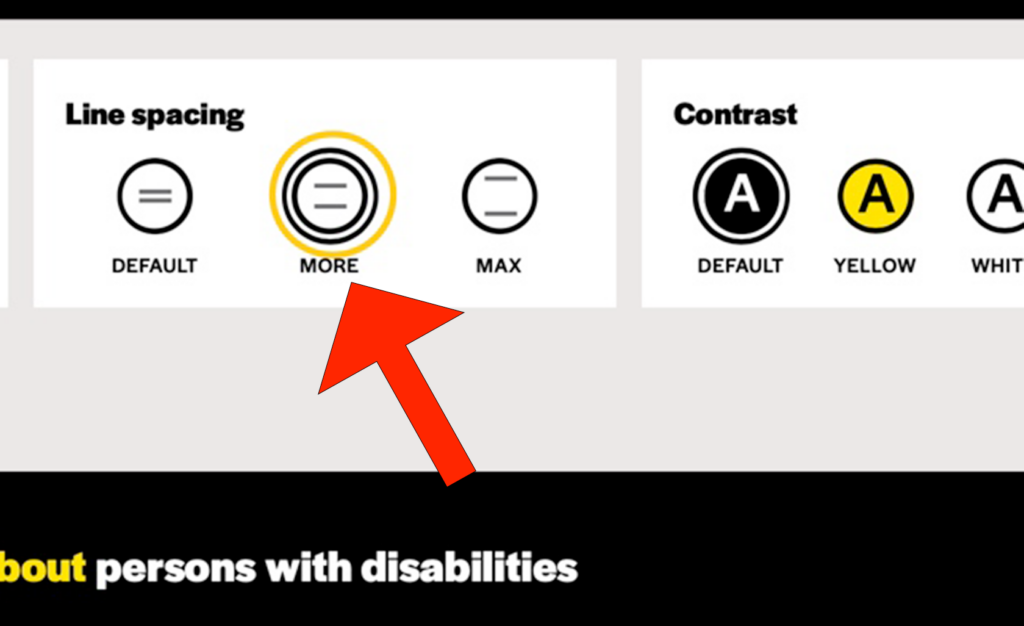
11. The “MAX” line spacing option offers the most space between text lines. To choose the max option, click on the icon furthest to the right in the line spacing section that says “MAX” below it. The icon is a white circle outlined in black with two black lines in the center. The lines are spaced farther apart than those in the “DEFAULT” and “MORE” setting icons.
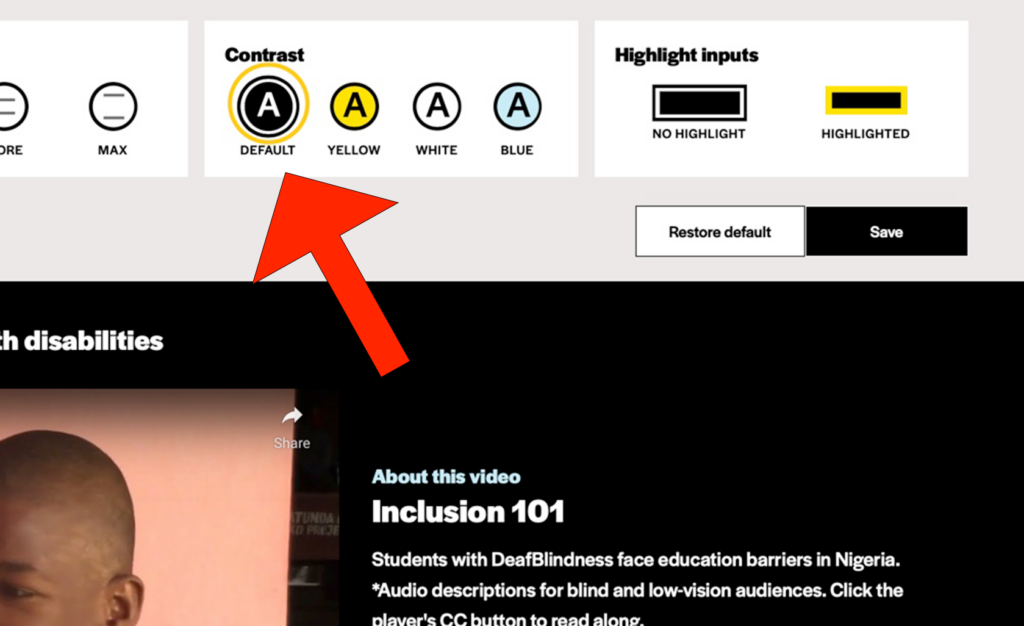
12. To adjust the “Contrast,” change the options listed under the “Contrast” section of the “Accessibility Settings” tab. Under the “Contrast” section, there are four accessibility options: “DEFAULT,” “YELLOW,” “WHITE,” and “BLUE.”
13. The “DEFAULT” contrast option is a black background with white text. To choose the default option, click on the icon furthest to the left in the “Contrast” section that says “DEFAULT” below it. The icon is a black circle with a white letter “A” in the center.
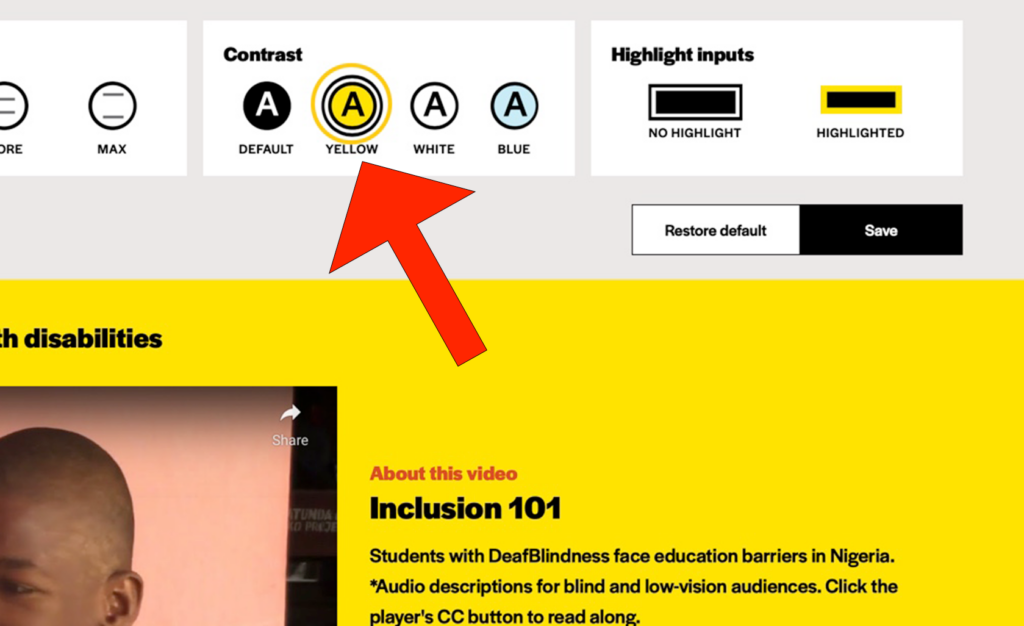
14. The “YELLOW” contrast option is a yellow background with black text. To choose the “YELLOW” option, click on the icon that says “YELLOW” below it. The icon is a yellow circle with a black letter “A” in the center.
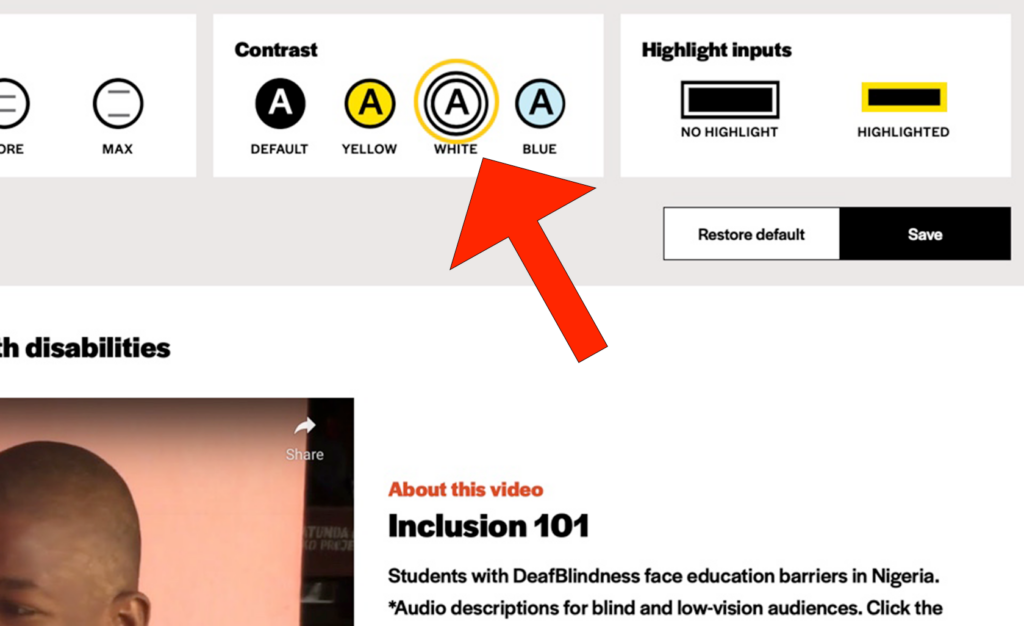
15. The “WHITE” contrast option is a white background with black text. To choose the “WHITE” option, click on the icon that says “WHITE” below it. The icon is a white circle with a black letter “A” in the center.
16. The “BLUE” contrast option is a blue background with black text. To choose the “BLUE” option, click on the icon furthest to the right in the contrast section that says “BLUE” below it. The icon is a blue circle with a black letter “A” in the center.
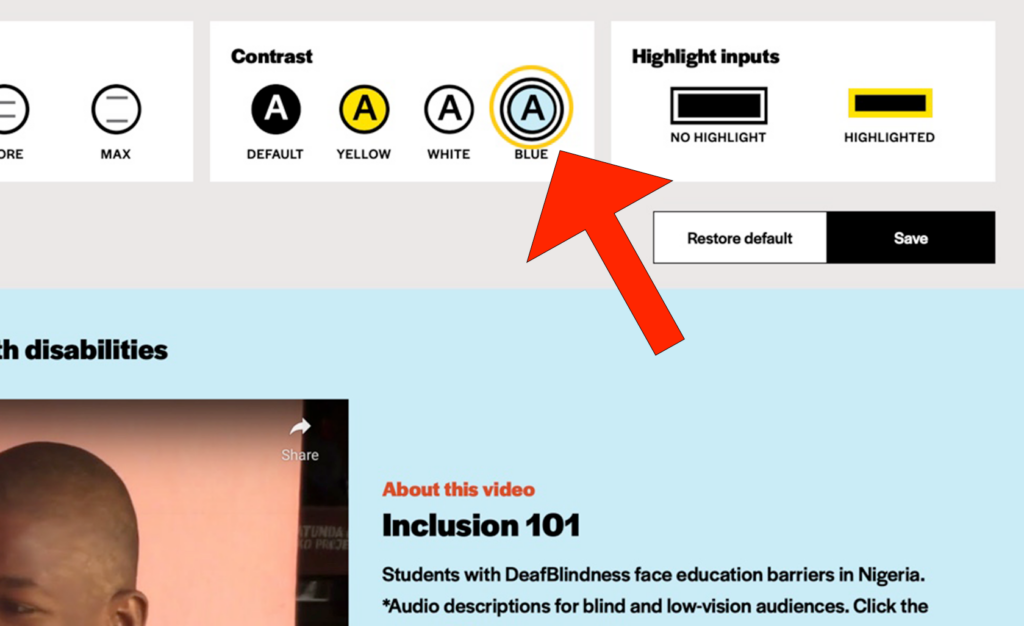
17. To adjust the “Highlight Inputs,” change the options listed under the “Highlight Inputs” section of the “Accessibility Settings” tab. Under the “Highlight Inputs” section, there are two accessibility options: “NO HIGHLIGHT” and “HIGHLIGHTED.”
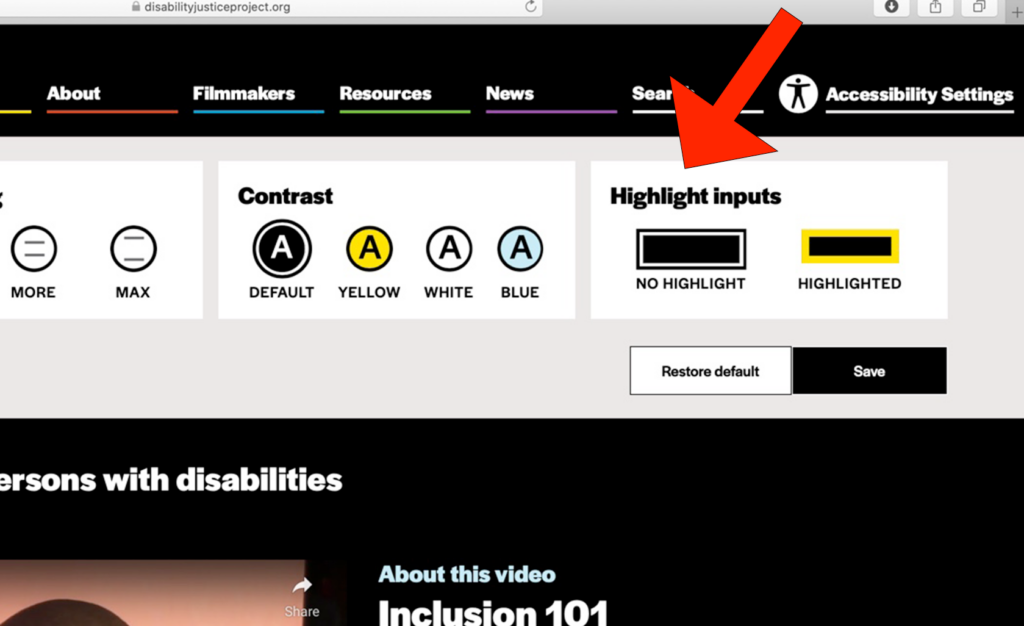
18. The “NO HIGHLIGHT” option is the default option. To select the “NO HIGHLIGHT” option, click the icon that is a black rectangle. When the “NO HIGHLIGHT” setting is selected, a black border will appear around it and become activated.
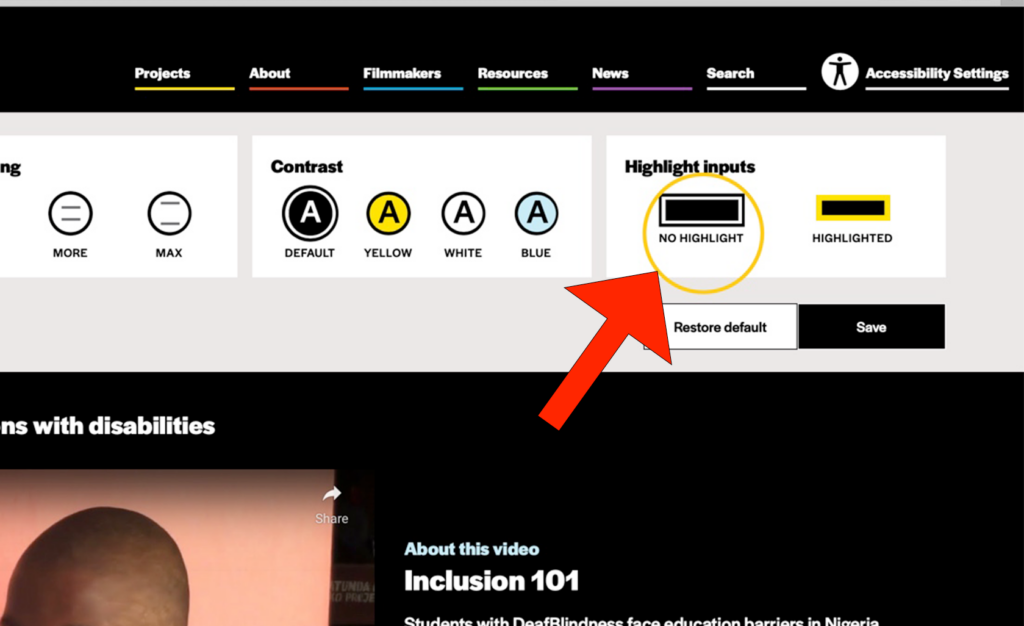
19. To add highlighted inputs, click the “HIGHLIGHTED” icon, which is a yellow rectangle with a black rectangle in the center. The icon has “HIGHLIGHTED” written under it.
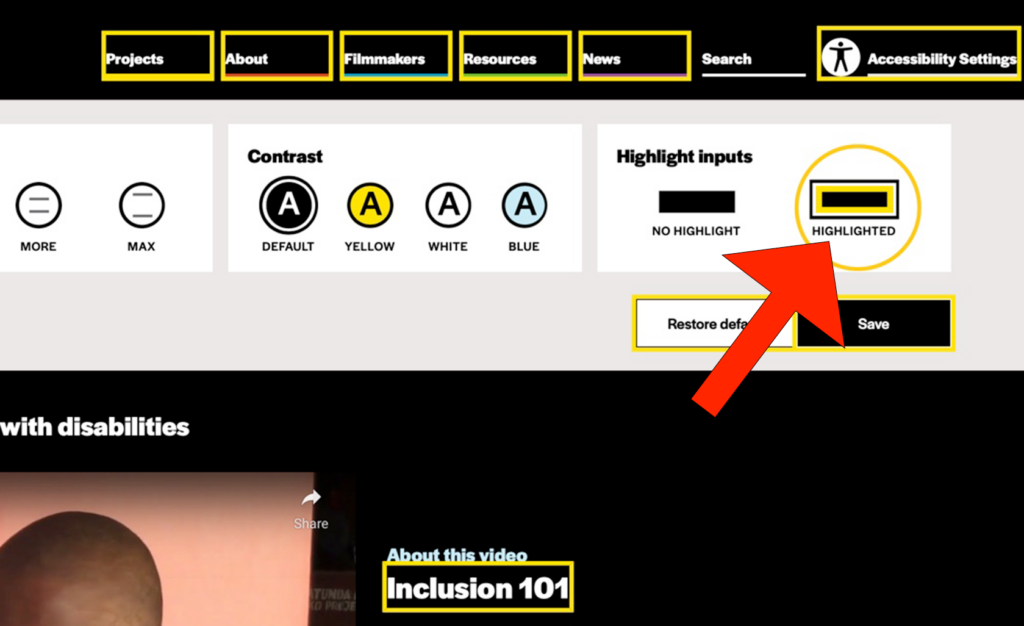
20. To save the accessibility settings you have selected, press the “Save” button on the bottom right of the accessibility settings tab. The “Save” button is a black rectangle with white text at the center that says, “Save.”
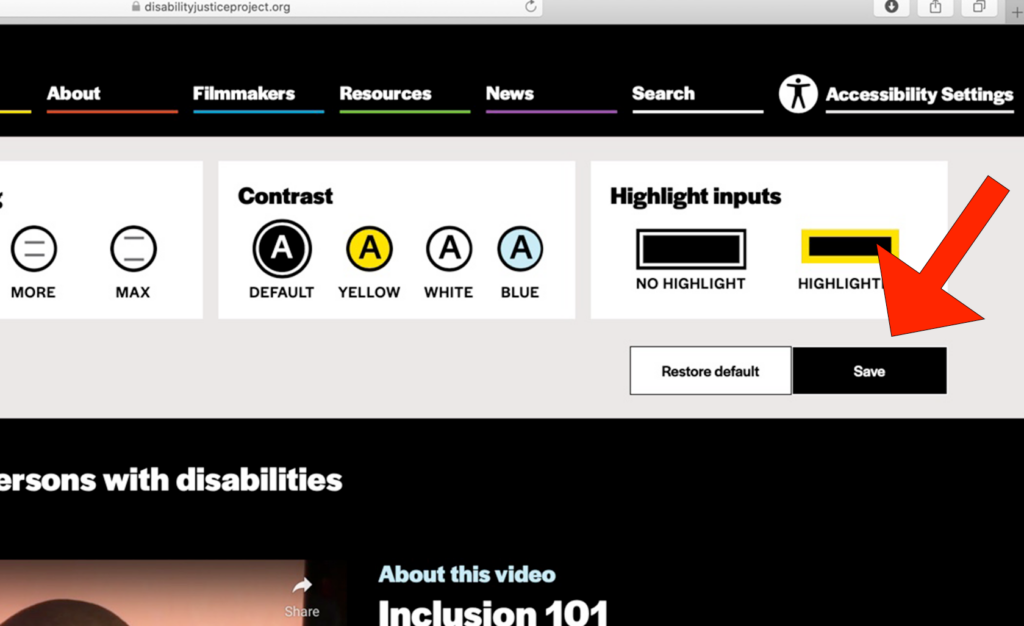
21. When your mouse is over the “Save” button, it will turn yellow and become activated.
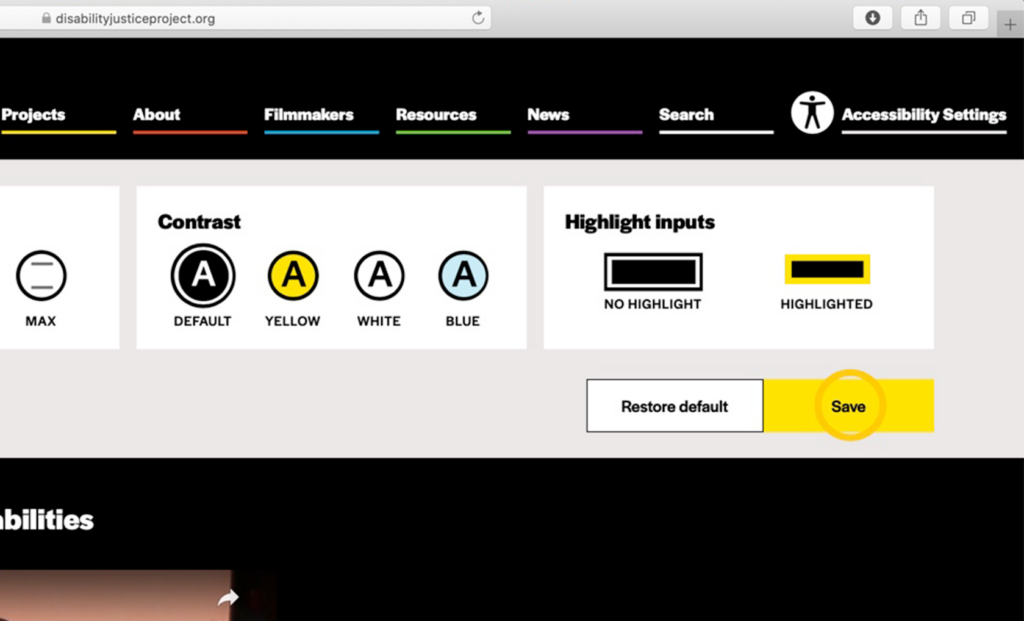
After you click on the “Save” button, the “Accessibility Settings tab” will close and the accessibility settings you selected will be maintained as you browse the DJP’s website.
22. To reset the accessibility settings to the default settings, click the “Restore Default” button located toward the bottom right of the accessibility settings tab. The “Restore Default” button is a white rectangle with black text at the center that says, “Restore Default.”
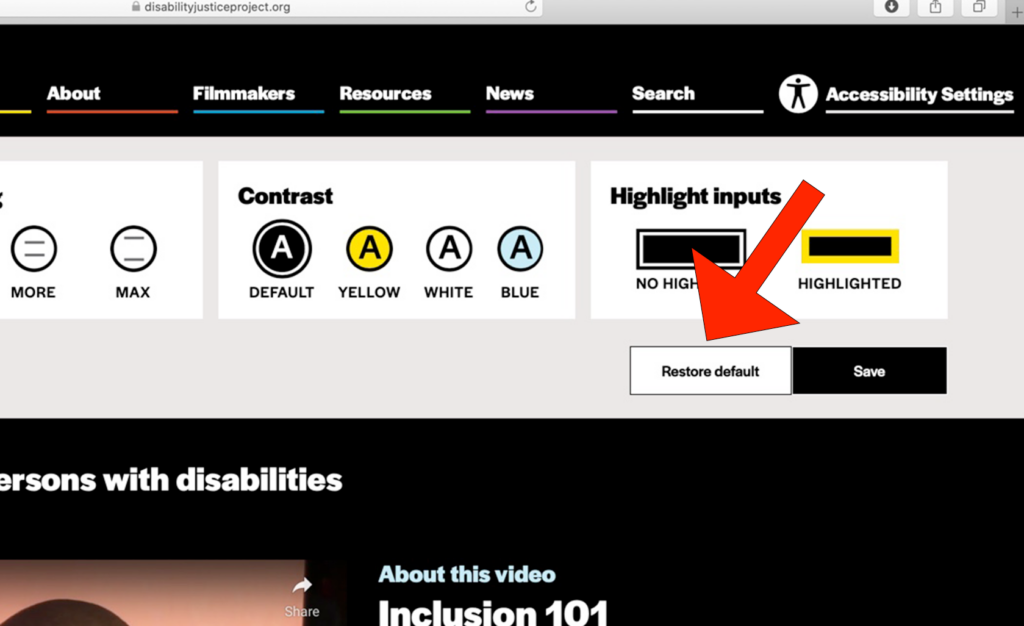
23. When your mouse is over the “Restore Default” button, it will turn yellow with black text, showing you can click on it. When you click on it, any changes that you made to the accessibility tab will return to the default settings.
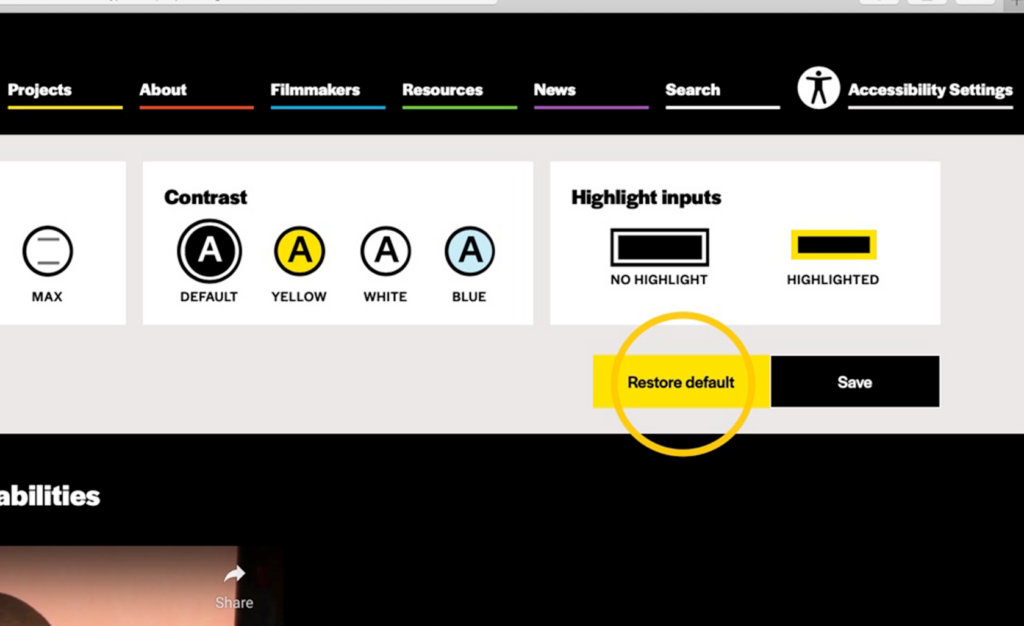
24. You can then click on the “Save” button to close the “Accessibility Settings” tab and continue browsing the Disability Justice Project’s website.

II. How to watch the videos using the Able Player
Video Instructions
Written Instructions for How to Watch Videos with the Able Player, with Screenshots Below
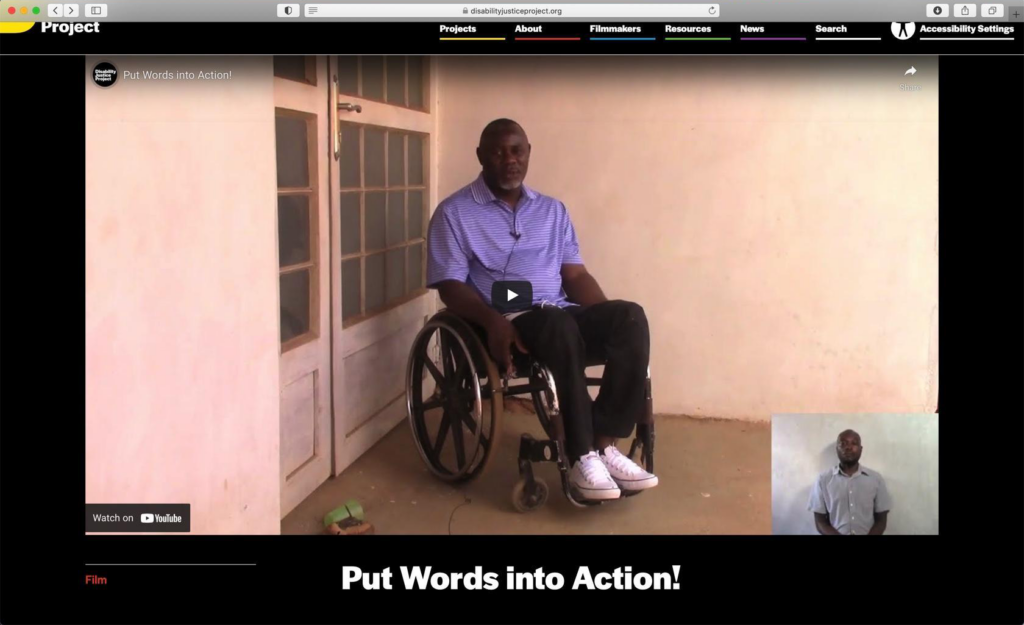
1. Type in disabilityjusticeproject.org.
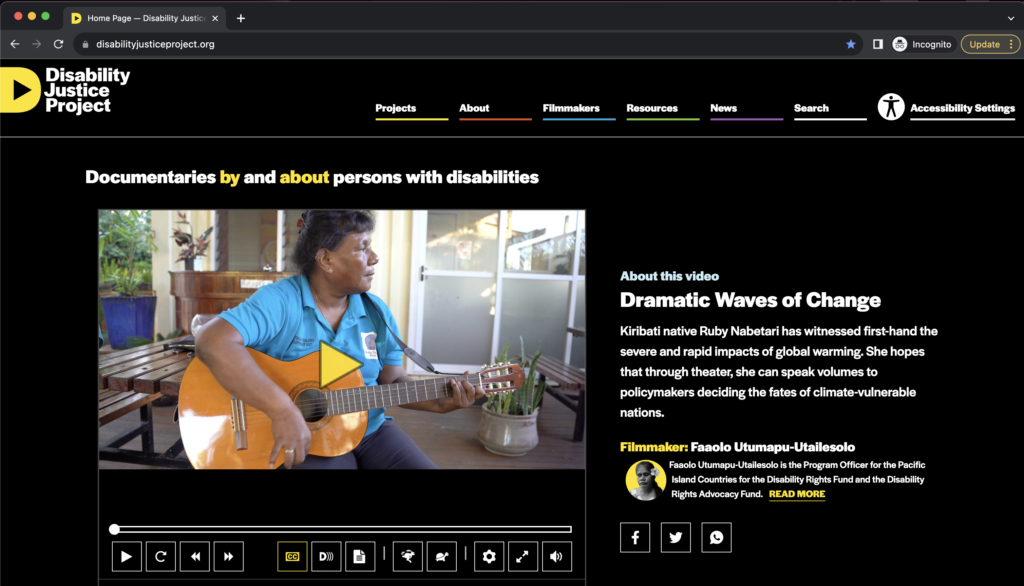
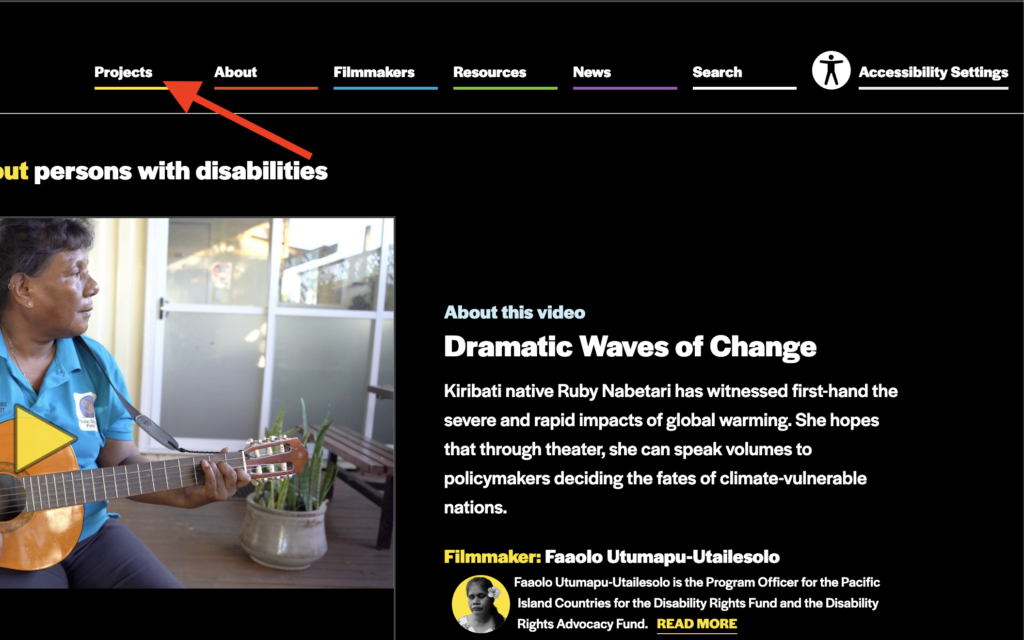
2. Click on “Projects” in the top right menu. It has a yellow line underneath it.
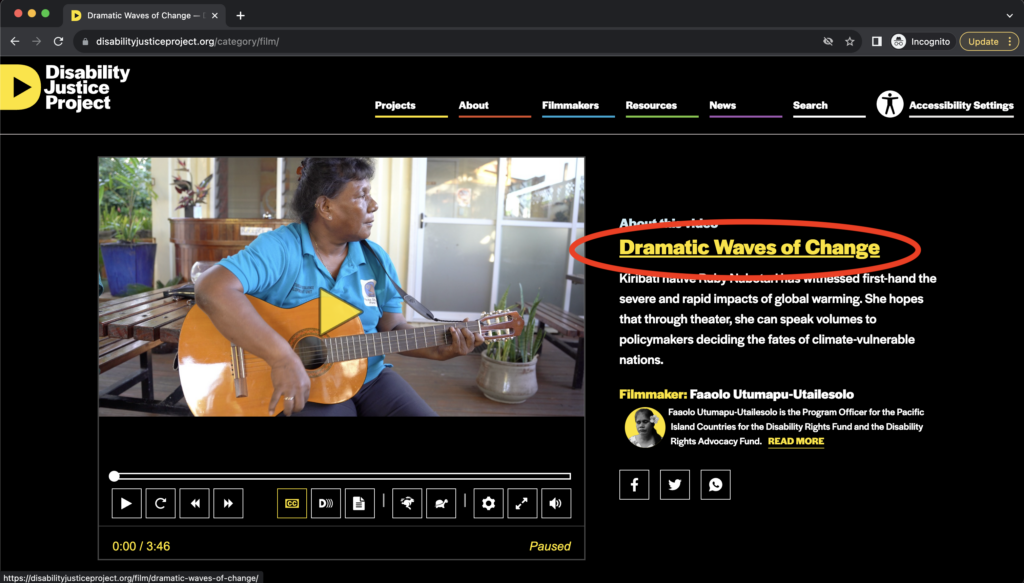
3. Once you’re on the “Projects” page, you can select which video you’d like to watch. To select a video, click on the title. When your mouse is over a title, it will turn from white to yellow. Clicking on a video title will take you to a separate page.
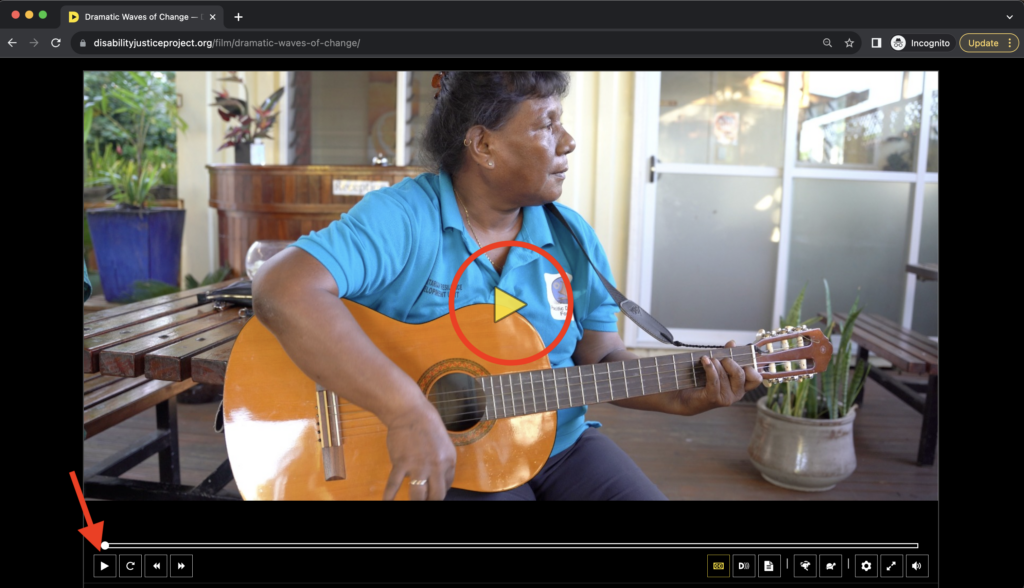
4. To watch a video in the Able Player, click on the yellow arrow in the middle of the video, or the white arrow in the bottom left of the player window.
5. To restart the video, click the button with the circular arrow icon. To rewind the video, click the button with arrows pointing to the left. To fast forward, click the button with arrows point to the right.

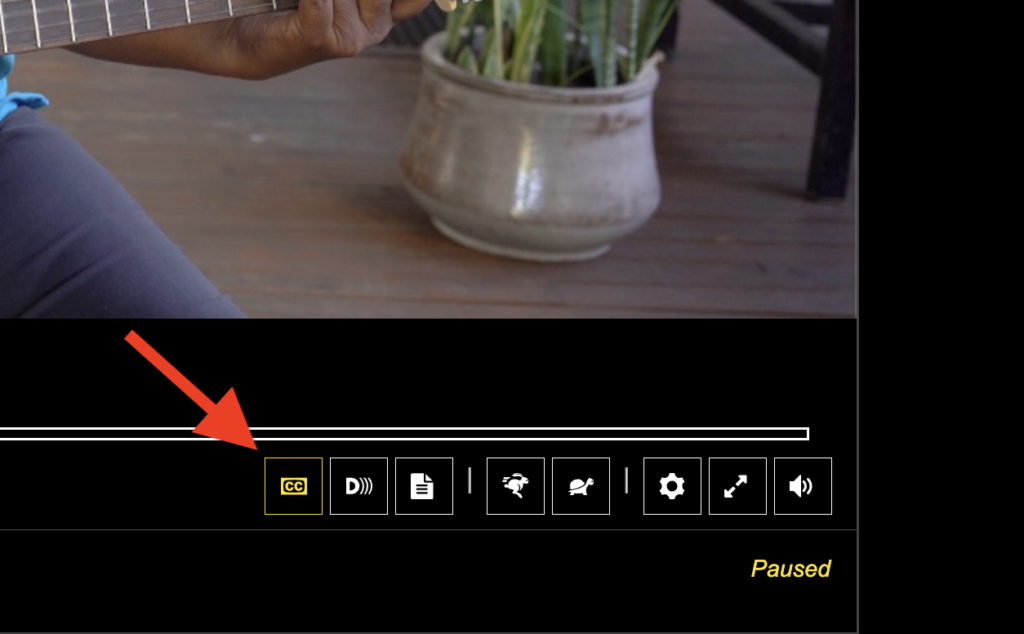
6. If you’d like to watch a video with captions, click on the white “cc” button that will appear under the seek bar of the Able Player. If captions are enabled, the button will turn yellow. To turn off the captions, click on the “cc” button again.
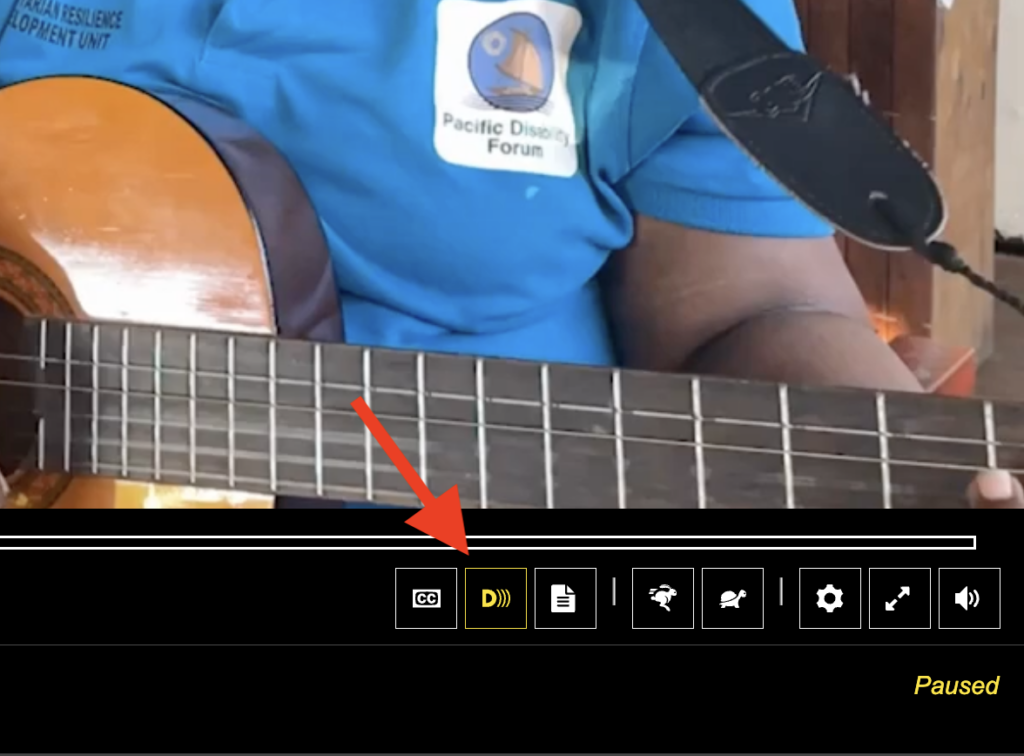
7. If you’d like to watch a video with audio descriptions, click on the white “D” button that will appear to the right of the captions button. If descriptions are enabled, the button will turn yellow. To turn off the audio descriptions, click on the “D” button again. Note that while watching with descriptions enabled, you will not be able to pause the video.
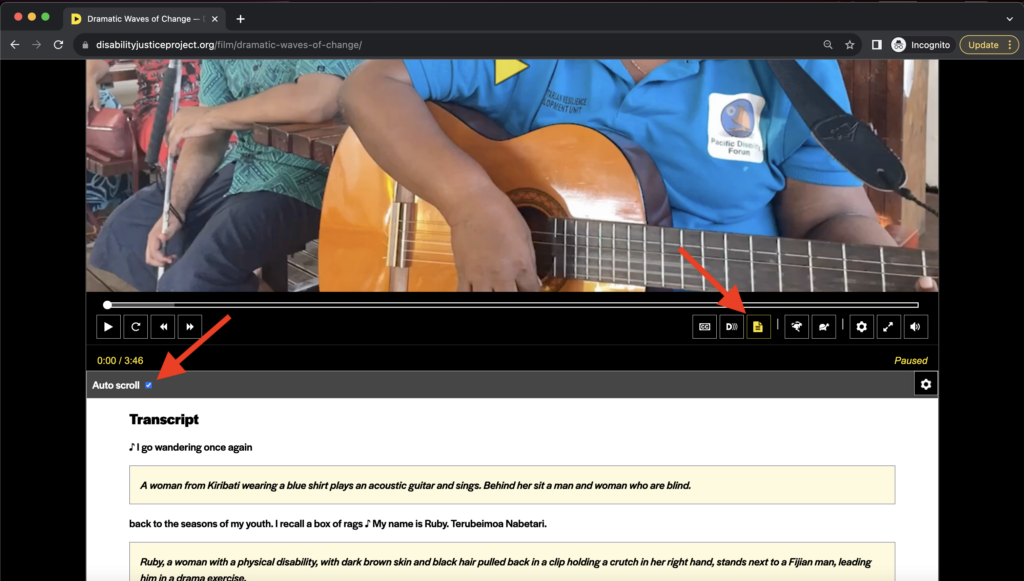
8. To open the interactive transcript, click on the white button with the page icon to the right of the descriptions button. The transcript will open underneath the Able Player window. To make the transcript scroll as the video plays, click the check box next to “Auto scroll” at the top of the transcript. To turn the interactive transcript off, click the button with the page icon again.
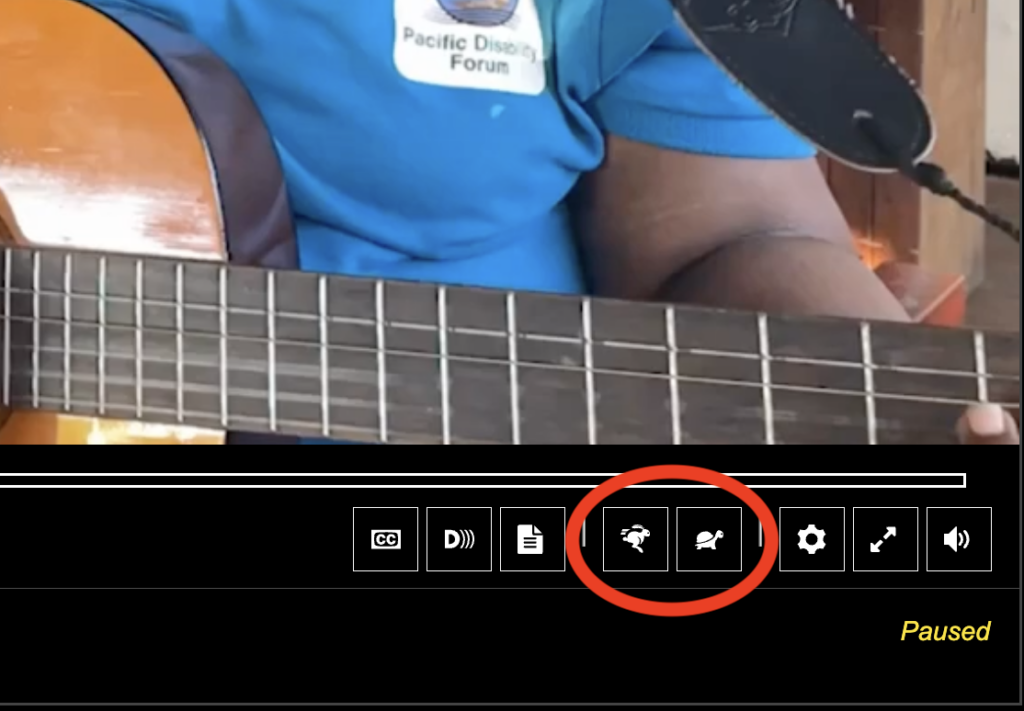
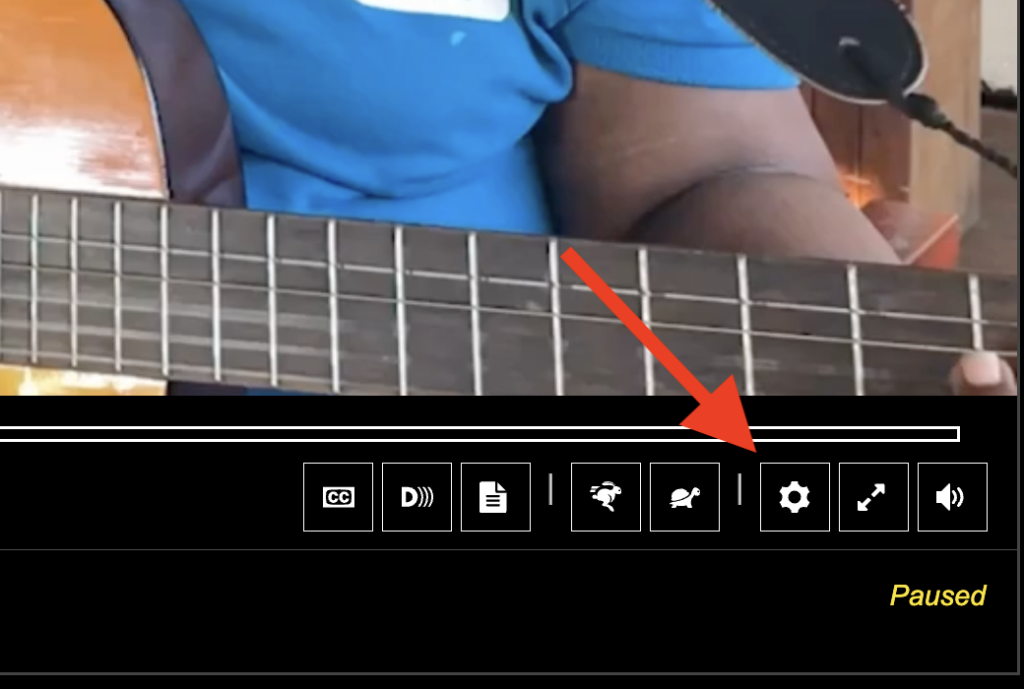
9. You can make a video play faster by clicking on the button with the rabbit icon to the right of the interactive transcript button. Clicking the button again will make the video play even faster. Likewise, you can make a video play slower by clicking the button with the turtle icon.
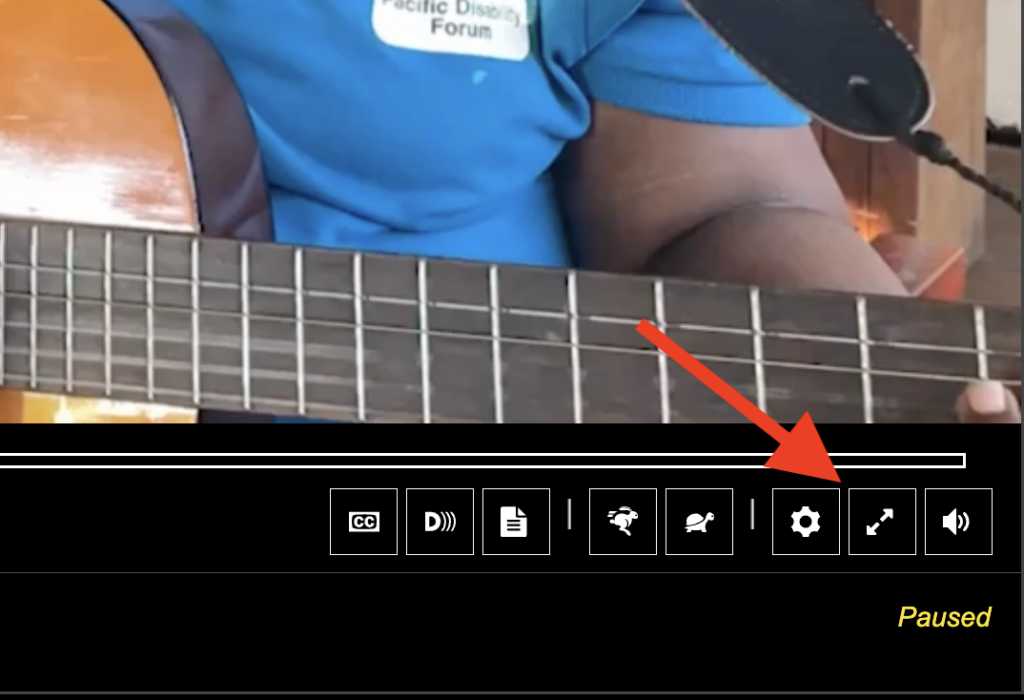
10. You can access the Able Player preferences by clicking the button with the gear icon to the right of the faster and slower buttons. This will open up a menu with options to change the captions, descriptions, keyboard, and transcript.
Watch the video below for more details and examples of changes you can make.
11. If you’d like a video to play full-screen, click the button with the icon of two arrows pointing away from each other at the bottom right of the Able Player.
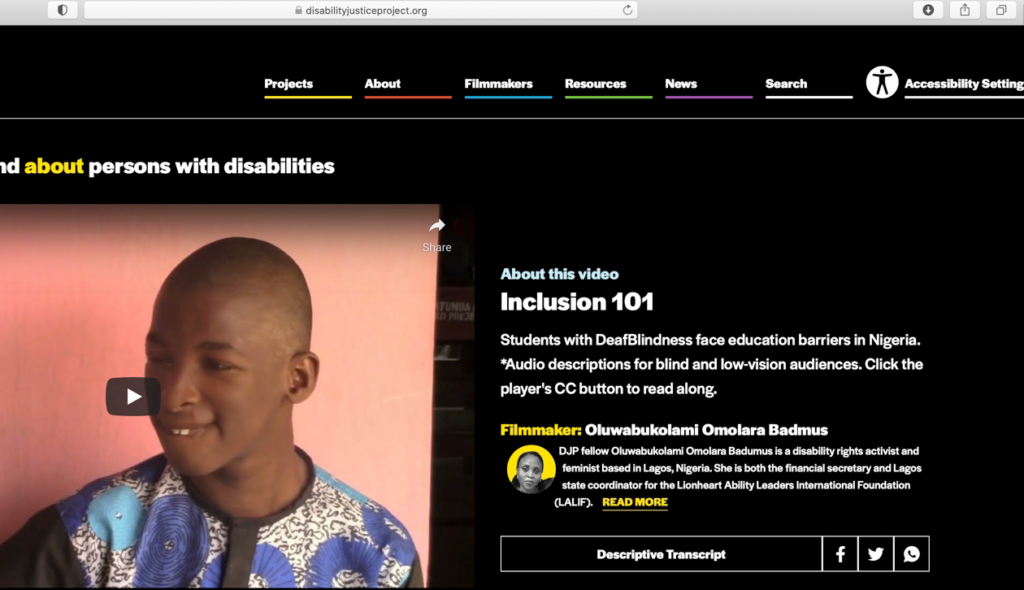
III. How to Use the “Search” Function
Video Instructions
Written Instructions for How to Use the “Search” function, with Screenshots Below
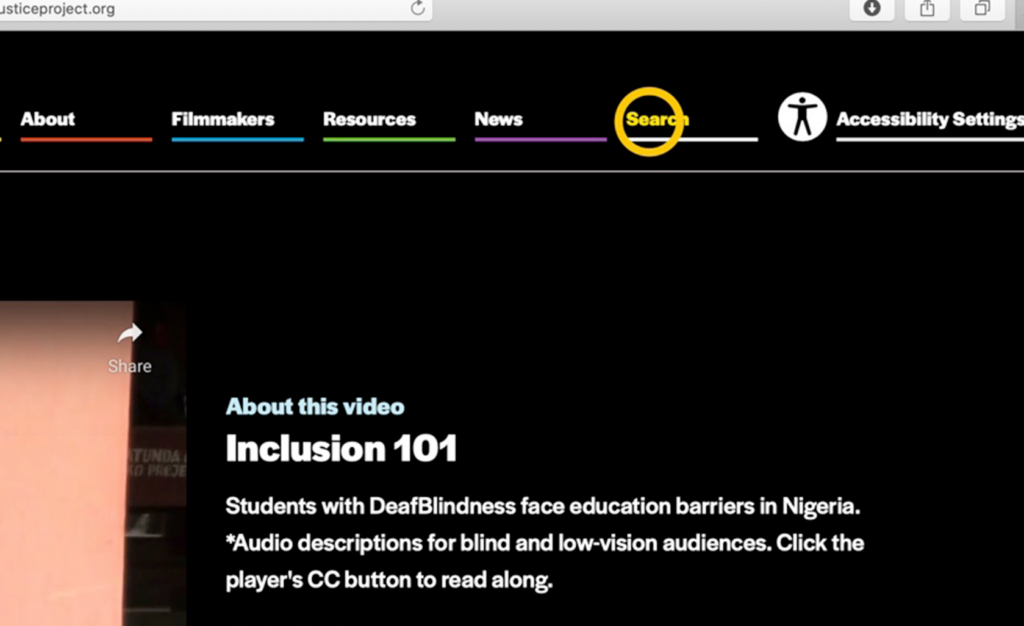
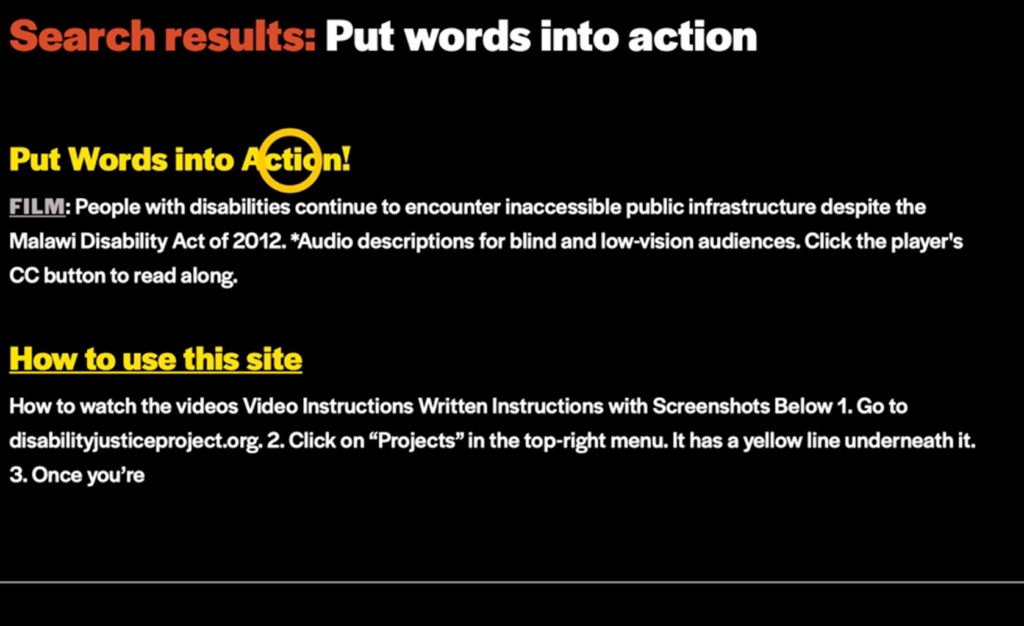
1. Type in disabilityjusticeproject.org.
2. Click on “Search” in the top-right menu. It has a white line underneath it.
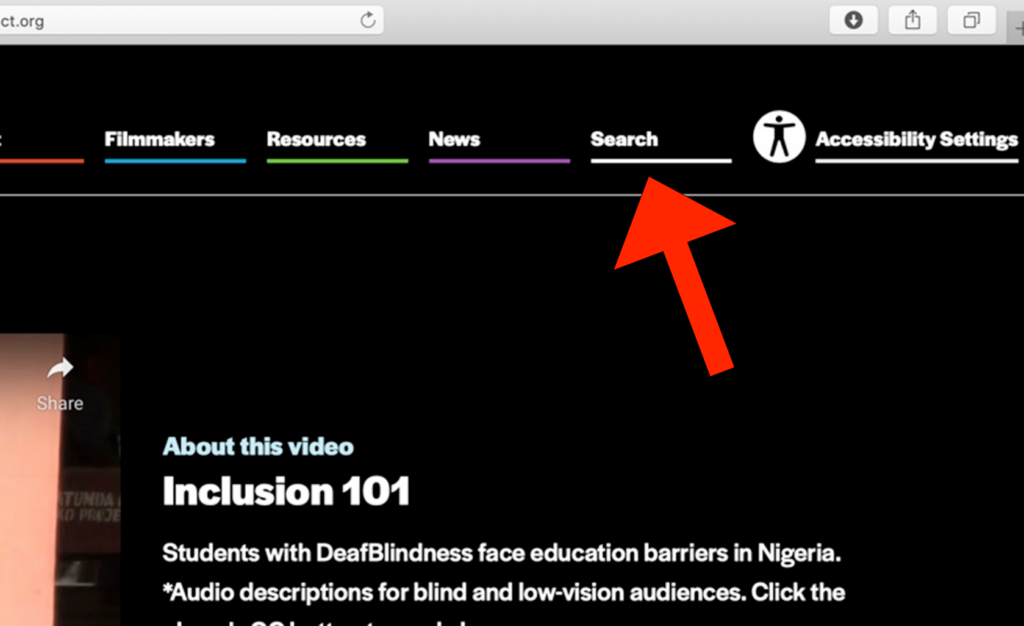
3. When your mouse is over the “Search” tab, the word “Search” will turn from white to yellow and become activated.
4. After you click on “Search,” a search box will appear at the top of the website.
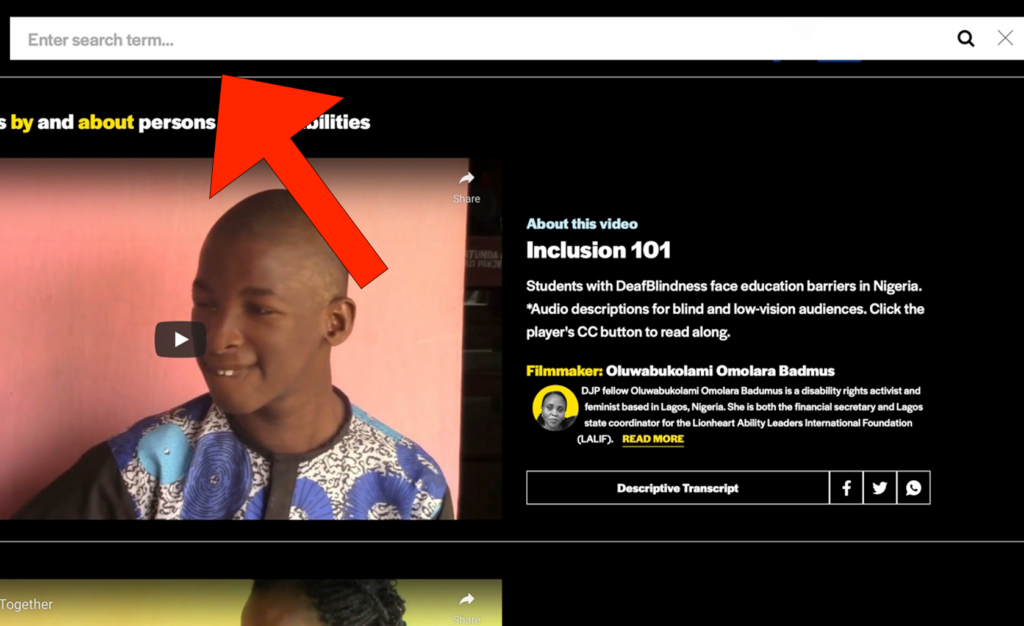
5. Type in a content topic, filmmaker’s name, video, news story, or other subject matter you are interested in finding on the Disability Justice Project’s website.
6. Click on the magnifying glass icon located on the right side of the search box. When the mouse is over the magnifying glass icon, it will turn yellow and become activated.
7. After you click on the magnifying glass icon, results from the search will be generated.
8. Clicking on the results you want to view will take you to specific website pages.
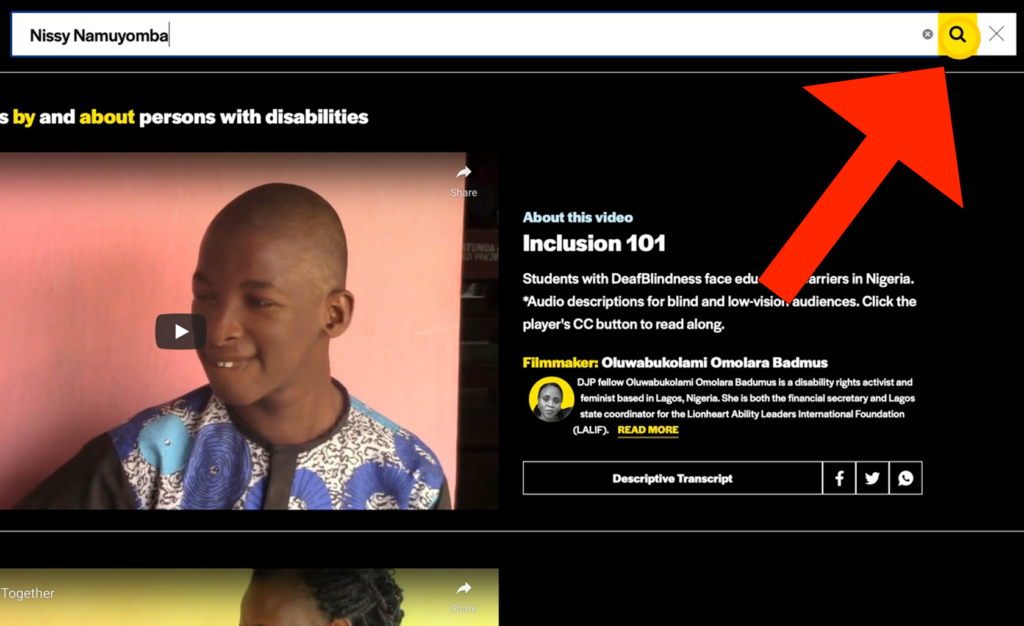
9. For example, to search for a specific filmmaker, type a filmmaker’s name in the search box.
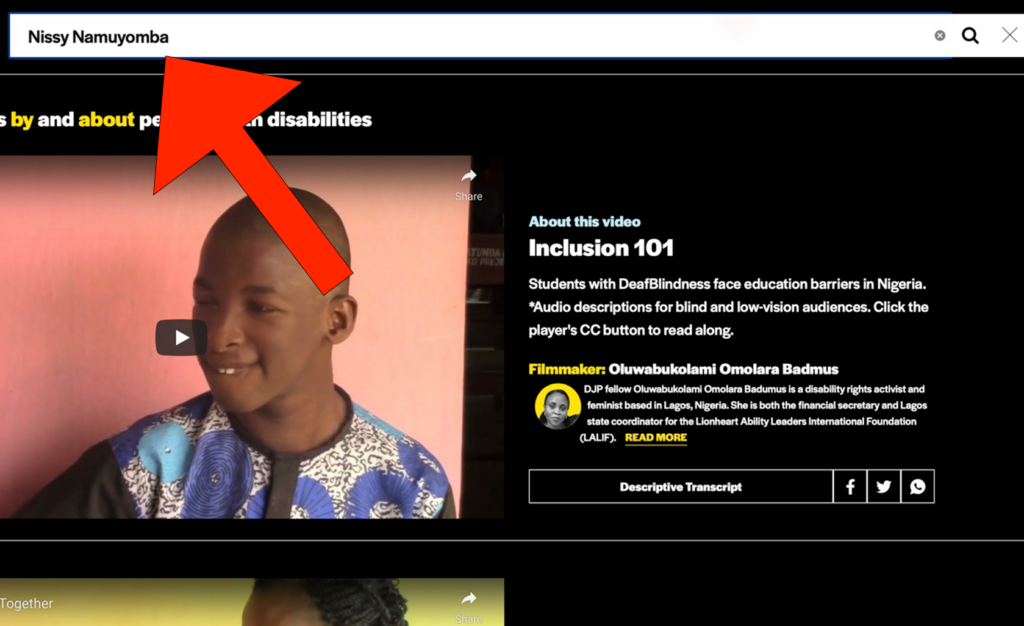
10. Click the magnifying glass icon after typing a filmmaker’s name in the search box.

11. Choose the filmmaker’s name from the search results that are generated.
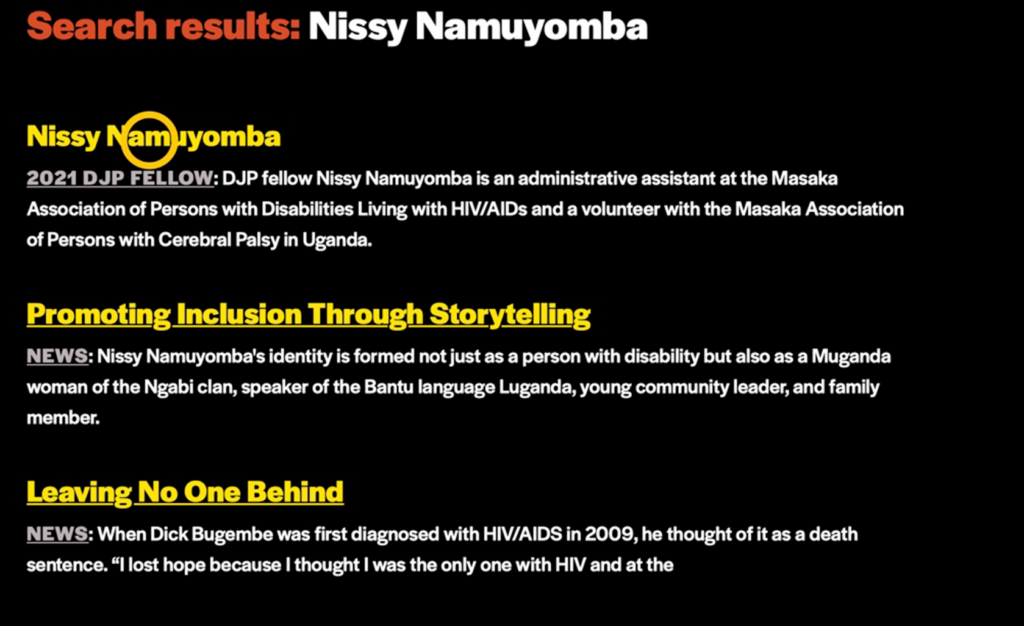
12. Clicking on the filmmaker’s name in the search results will open a page about the filmmaker, featuring their bio and other details.
13. To close the search box, click on the black “X” located to the right of the magnifying glass icon.
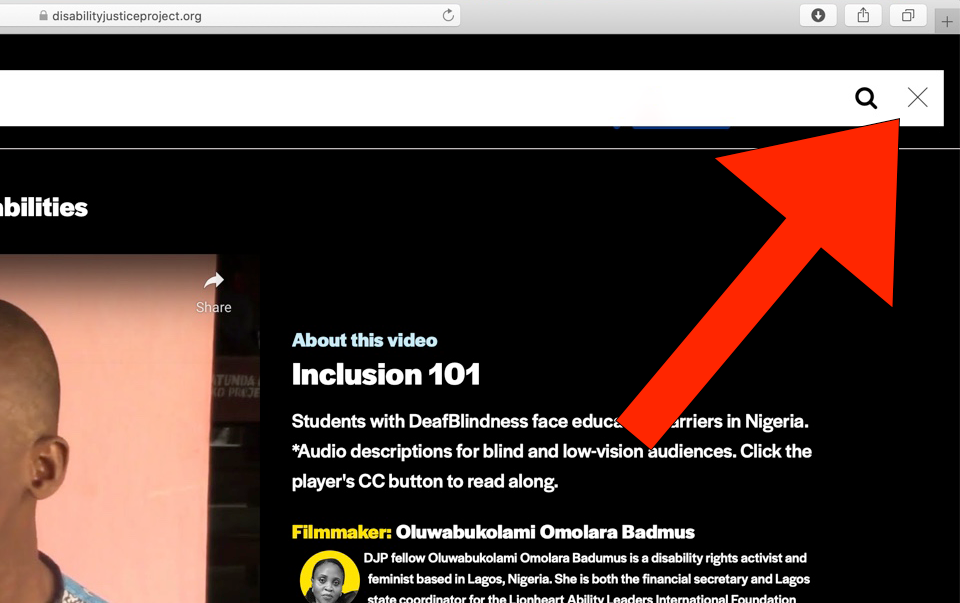
14. When the mouse is over the “X,” the icon will turn yellow and become activated.
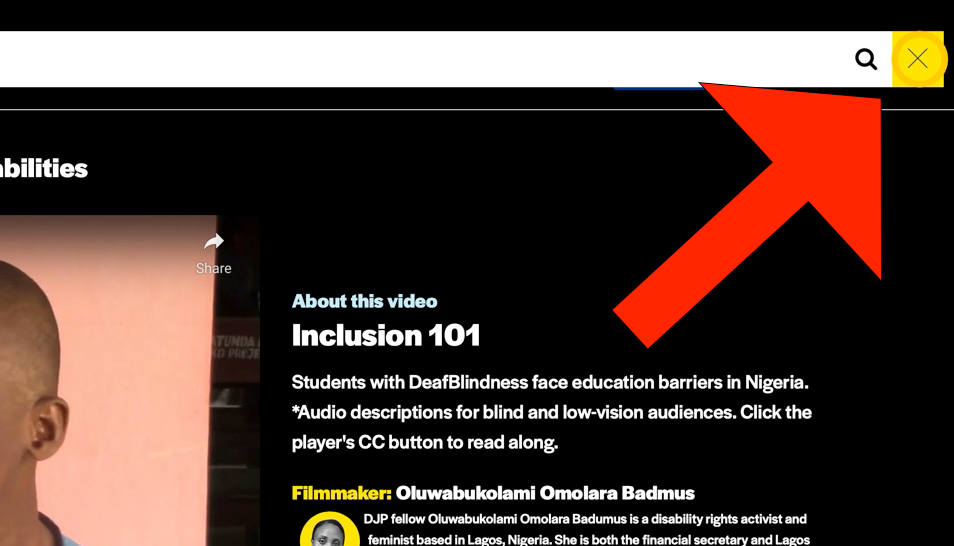
15. After clicking on the “X,” the search box will close.
IV. How to use the “News” tab
Video instructions
Written Instructions for How to Use the “News” tab, with Screenshots Below
1. Type in disabilityjusticeproject.org.

2. Click on the “News” tab in the top-right menu. It has a purple line underneath it. When your mouse is over “News,” the line underneath it will turn from purple to white.

3. Once you’re on the “News” page, it will feature all news stories the Disability Justice Project has published.
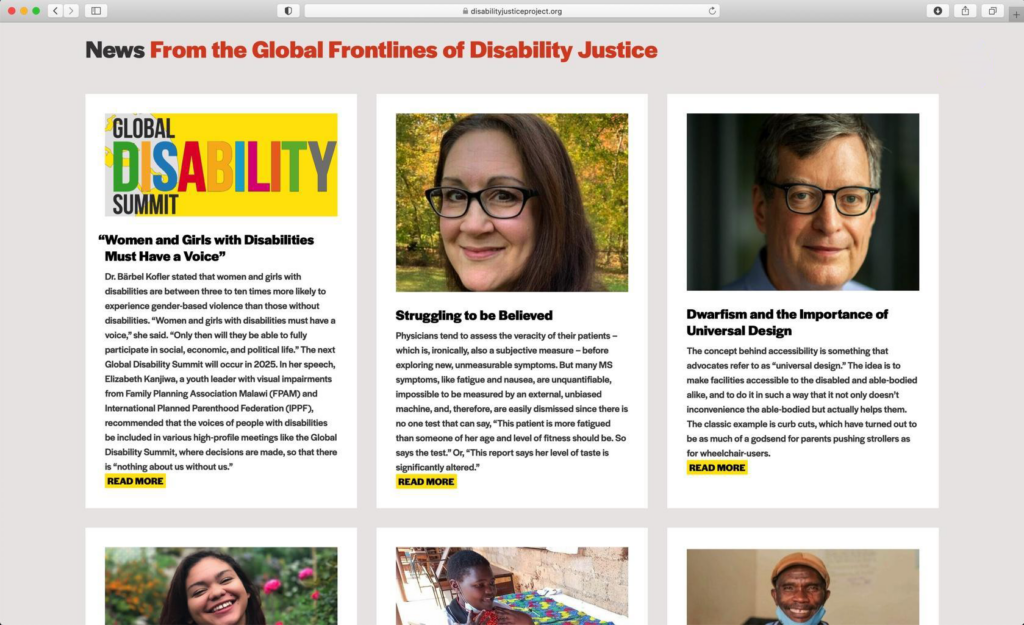
4. To open a story, move your mouse over a news story’s image and click on it. The image will turn yellow.

5. When you click on the image or headline, you will be taken to a new page showing a full news story.

6. Another way to open a news story is to move your mouse over a news story’s headline and click on it. The headline will turn red.

7. When you click a headline, you will be taken to a new page showing a full news story.

8. To listen to an audio version of a news story, scroll down to the audio player located underneath the headline of a news story.

9. Click on the “Play” button located on the left side of the audio player. The play button is a red sideways triangle icon.

10. When your mouse is over the “Play” button, a green box appears around it and a text bubble will say, “Play.” When you click on the button, the audio will start playing.

11. After you click on the “Play” button on the audio player, the green box around it will turn yellow and become activated. The “Play” icon on the audio player icon will change from a sideways triangle to a “Pause” icon with two parallel lines once the audio starts.

12. To pause the audio, click on the “Pause” button.

13. To adjust the volume of the audio, click on the “Volume” button, a speaker icon on the right side of the audio player.

14. When your mouse is over the “Volume” icon, a green box will appear around it, and a text bubble will say, “Volume.”

15. After you click on the “Volume” button, you will be able to adjust the volume by sliding the yellow bar up and down the light gray track that appears.

16. To restart the audio, click on the “Restart” icon, which is the button showing an arrow forming a partial circle on the left side of the audio player.

17. When your mouse is over the “Restart” icon, a green box will appear around it, and a text bubble will say “Restart.”

18. After you click on the “Restart” button, the green box around the icon will turn yellow and become activated. The audio will restart from the beginning of the story.

19. You can fast forward the audio by clicking on the “Forward” icon that has two small double arrows pointing to the right on the left side of the audio player.

20. When your mouse is over the “Forward” icon, a green box will appear around it.

21. After you click the “Forward” icon, the green box will turn yellow and become activated. The audio will move forward 10 seconds. You can click on the “Forward” icon again to keep fast-forwarding the audio. Each time you click on the “Forward” icon, the audio will move forward 10 seconds.

22. You can rewind the audio by clicking on the “Rewind” icon that has two small double triangles pointing to the left on the left side of the audio player.

23. When your mouse is over the “Rewind” icon, a green box will appear around it, and a text bubble will say “Rewind.”

24. After you click on the “Rewind” icon, the green box will turn yellow and become activated. The audio will move backward 10 seconds. You can click on the “Rewind” icon again to keep rewinding the audio. Each time you click on the “Rewind” icon, the audio will move backward 10 seconds.

25. You can slow down the audio by clicking on the black turtle icon on the left side of the audio player.

26. When your mouse is over the black turtle icon, a green box will appear around it, showing you may click on the icon.

27. You can speed up the audio by clicking on the black rabbit icon located to the right of the turtle.

28. When your mouse is over the black rabbit icon, a green box will appear around it, showing you may click on the icon, and a text bubble will say “Faster.”

29. After you click on either the turtle or rabbit icon, a yellow box will appear around them and become activated.

30. You can click on either the turtle or rabbit icon several times to increase or decrease the audio player’s speed by 0.25x increments.

31. To access a text version of the audio, scroll down below the audio player.

32. At the end of each news article, text within a white prompt box with a gray outline asks if you would like to share your own story with the Disability Justice Project. If one of our news stories inspires you to tell us about your experiences, click on the prompt box.
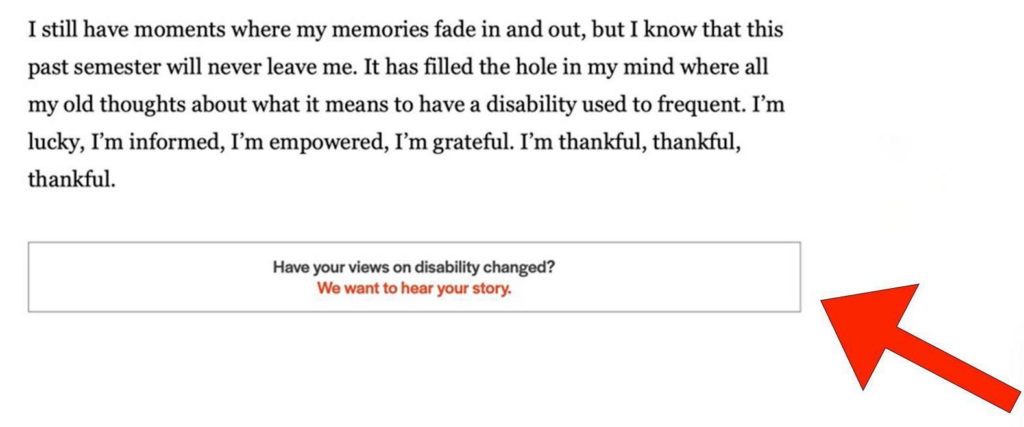
33. When your mouse is over the prompt box, it will turn yellow.

34. When you click on the prompt box, a consent checkbox will appear beneath the prompt box. To have your story published by the Disability Justice Project, you must consent to have your story published by the DJP.
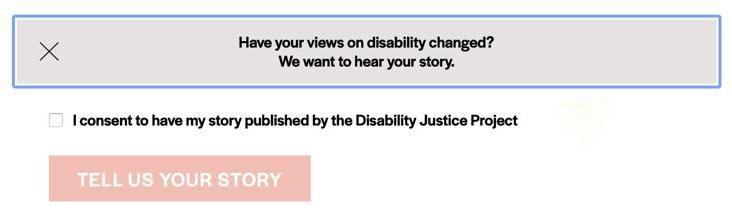
35. To consent, click the small white box next to the text that says, “I consent to have my story published by the Disability Justice Project.” The box will turn blue with a white checkmark inside to show that you have consented.

36. Once you have checked the consent box, you can click the red button that says “TELL US YOUR STORY.” When your mouse is over the orange button, it will turn yellow.

37. When you click on the “TELL US YOUR STORY” button, an email will be generated in a new window. You can write your story in the email and send it to us.

V. How to apply for the fellowship
Below is an example of how to apply for the Disability Justice Project fellowship. Please review the “About” tab on our website and subscribe to our newsletter to stay up to date on fellowship applications and eligibility requirements.
Video instructions
Written Instructions for How to Apply for the Fellowship, with Screenshots Below
1. Type in disabilityjusticeproject.org.

2. Click on “About” in the top-right menu. It has a red line underneath it. When your mouse is over “About,” the line underneath it will turn from red to white.

3. Once you’re on the “About” page, scroll down to the “Who can apply to DJP?” section.

4. In the “Who can apply to the DJP?” section, click on the Application link and Frequently Asked Questions link. Both links are in red.

The application and FAQs will automatically download as word documents you can open, view and edit.


Please read through the FAQ page before you begin filling out your application to learn more about the Disability Justice Project, who is eligible to apply for the fellowship, what the requirements are, and what you will learn during the 12-week workshop.
5. The application has two parts. The first part should be filled out by the potential fellow.

6. The second part of the application must be filled out by the potential fellow’s sponsoring OPD.

7. After filling out the application with your OPD, attach it to an email and send it to Disability Justice Project Founding Executive Director/Editor-in-Chief Jody Santos at jsantos@disabilityjusticeproject.org.

8. Be sure to write “Fellowship Application” in the subject line of the email.
